Installation
This guide walks a merchant or developer through setting up the Store Locator with Adobe Commerce. The app supports both Adobe Commerce PaaS/On-Prem and Adobe Commerce SaaS (Adobe Commerce as a Cloud Service).
Pre-Reqs
- Adobe Developer App Builder Project: An active App Builder project configured for your Adobe Commerce instance’s organization. The following APIs must be added to the project:
- Adobe Commerce as a Cloud Service API (for SaaS environments)
- I/O Management API (for PaaS and On-Prem environments)
- Adobe Commerce: Version 2.4.7 or higher / Adobe Commerce SaaS (Adobe Commerce as a Cloud Service).
- Adobe I/O CLI and plugins: For deploying App Builder actions.
- For AIO CLI installation see (https://developer.adobe.com/runtime/docs/guides/tools/cli_install/)
- Plugins:
$ aio plugins:install @adobe/aio-cli-plugin-api-mesh $ aio plugins:install https://github.com/adobe-commerce/aio-cli-plugin-commerce - Local environment running Linux or compatible (i.e. macOS or Windows with WSL2)
- This repo contains a devcontainer suitable for running the solution, which requires a compatible IDE like Visual Studio Code and an OCI Runtime like Docker or Podman. The devcontainer is only available from the GitHub repository (https://github.com/BlueAcornInc/aio-commerce-storelocator).
Adobe Commerce PaaS / On-Prem Setup
These steps apply to Adobe Commerce Cloud (PaaS) and On-Premise deployments.
1. Install Required Commerce Modules
Install the following Composer packages on your Commerce instance:
# Admin UI SDK (required for app registration)
composer require "magento/commerce-backend-sdk":">=3.3"

# Storefront compatibility (required for EDS Storefront)
composer require adobe-commerce/storefront-compatibility

# IMS integration (required for App Builder communication)
composer require adobe-commerce/adobe-ims-metapackage
2. Configure IMS
The app communicates with your Commerce instance through Adobe IMS. Ensure your instance is configured with IMS and belongs to the same organization as your App Builder project.
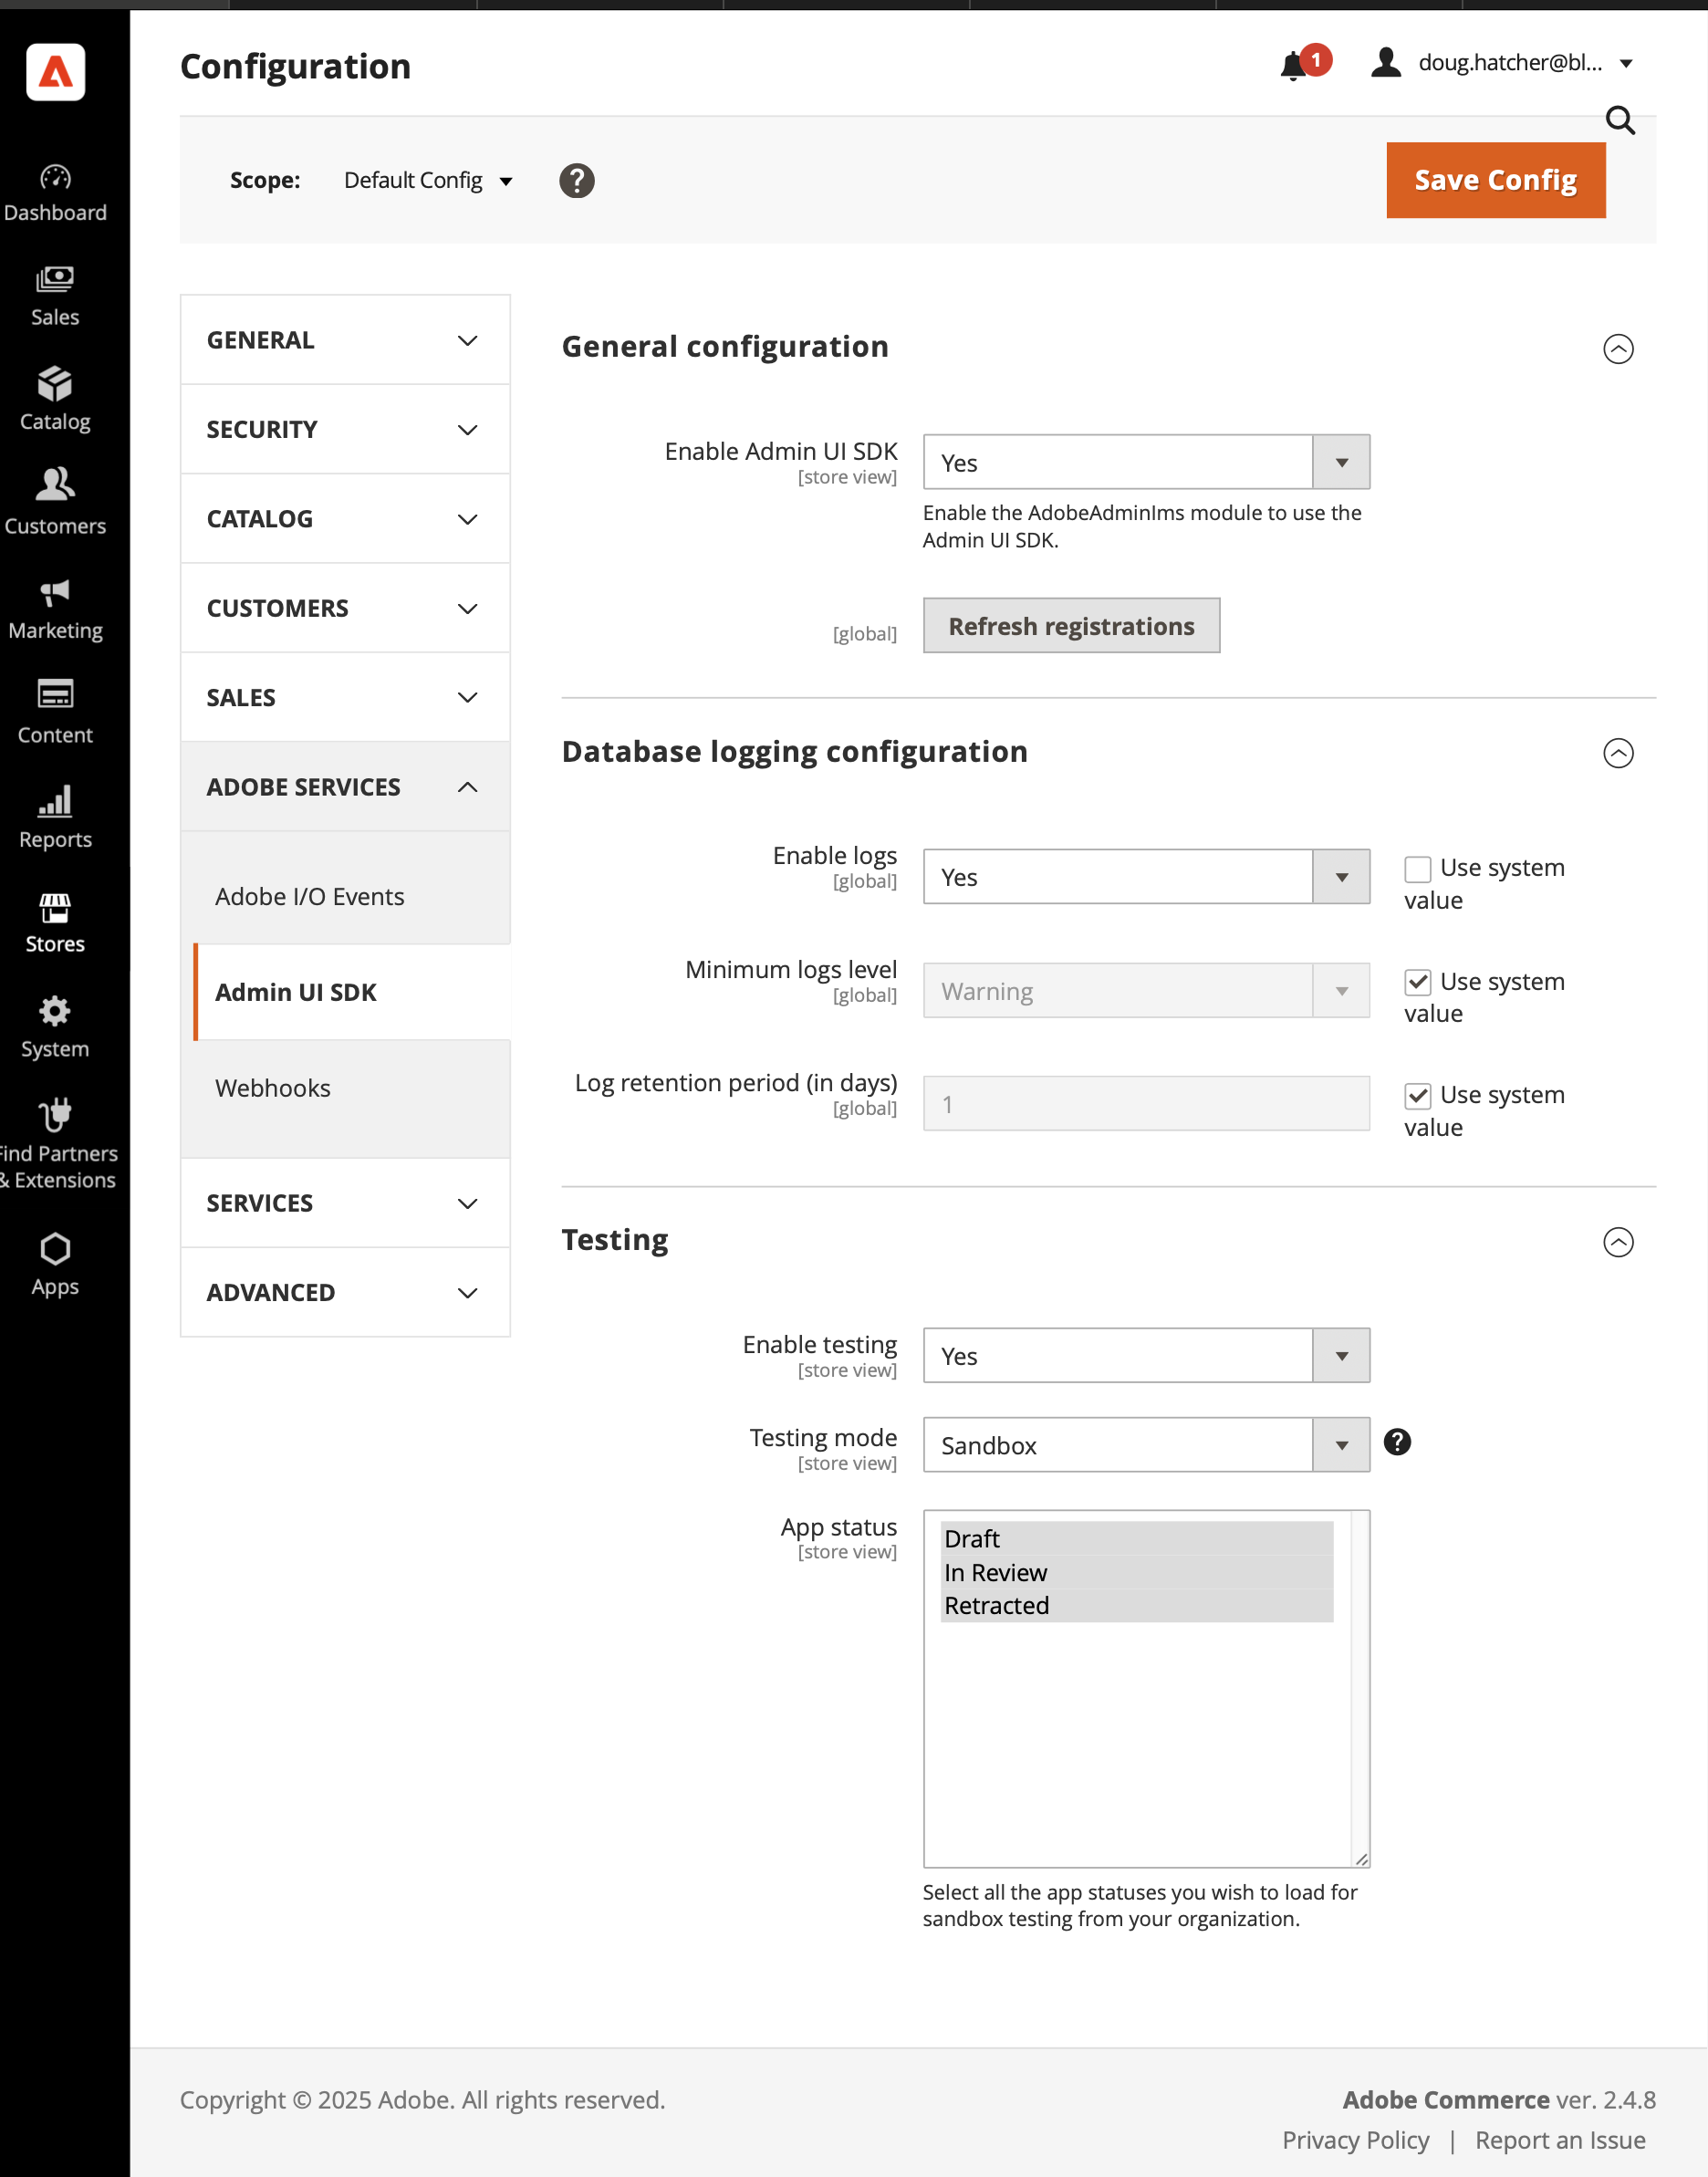
3. Configure Admin UI SDK
Go to Stores > Configuration > Adobe Services > Admin UI SDK and configure it to suit your needs. Refer to official documentation for more details.
4. Create an Integration
This step allows your App Builder application to authenticate and communicate with your Commerce backend via OAuth 1.0a.
In the Adobe Commerce Admin panel:
- Navigate to System > Extensions > Integrations
- Click Add New Integration
- Fill in the following:
- Name: e.g.
Store Locator App Builder Integration - Leave other fields blank unless required by your organization
- Name: e.g.
- Under the API tab, click Select All to grant all permissions, or configure scopes as needed
- Save the integration and then activate it
- You will be shown the following credentials:
- Consumer Key
- Consumer Secret
- Access Token
- Access Token Secret
These credentials will be entered in App Management (see App Management Configuration below).
5. Install Storefront Compatibility Package
For Adobe Commerce Cloud and On-Premise, install the Adobe Storefront compatibility package (PHP module). See the Adobe Experience League article for the complete procedure.
Adobe Commerce SaaS Setup
These steps apply to Adobe Commerce as a Cloud Service (SaaS) deployments.
SaaS instances come with IMS, Admin UI SDK, and the Storefront compatibility layer pre-configured. No Composer packages or IMS setup is required.
1. Ensure API Access
In the Adobe Developer Console, verify that your App Builder project has the Adobe Commerce as a Cloud Service API added.
2. Obtain IMS Credentials
For SaaS authentication, you will need:
- IMS Client ID — from your Adobe Developer Console project
- IMS Client Secret — from your Adobe Developer Console project
These credentials will be entered in App Management (see App Management Configuration below).
Setup EDS Storefront
Note: This app is built for Edge Delivery Services (EDS) Storefront (document-based authoring). It is not designed for Luma or PWA Studio storefronts.
If you haven’t already, prepare the project and workspaces within your Adobe App Builder organization, as well as the code repos that represent Adobe Commerce Storefront.
aio commerce init will create a few repos for you in GitHub, so you must be authenticated with GitHub. The gh tool can help with this.
$ gh auth login
$ aio commerce init
Deploy The App
Use aio app use to point to the right App Builder workspace. You can use the following sequence to set this up. You may also log in to the Adobe Developer App Builder Console, navigate to the project and workspace, and download a workspace.json that can also configure this project.
Note: Be sure to run
npm installbefore deploying to ensure all dependencies are installed.
aio login
aio console org select
aio console project select
aio console workspace select
aio app use

npm install

aio app build
aio app deploy # this will build the app and register it for use in Adobe Commerce
Once this is complete, add the app to your Commerce instance by going to Stores > Configuration > Adobe Services > Admin UI SDK > Refresh Registrations, then in Configure Registrations selecting the app to use.
Confirming the app is available
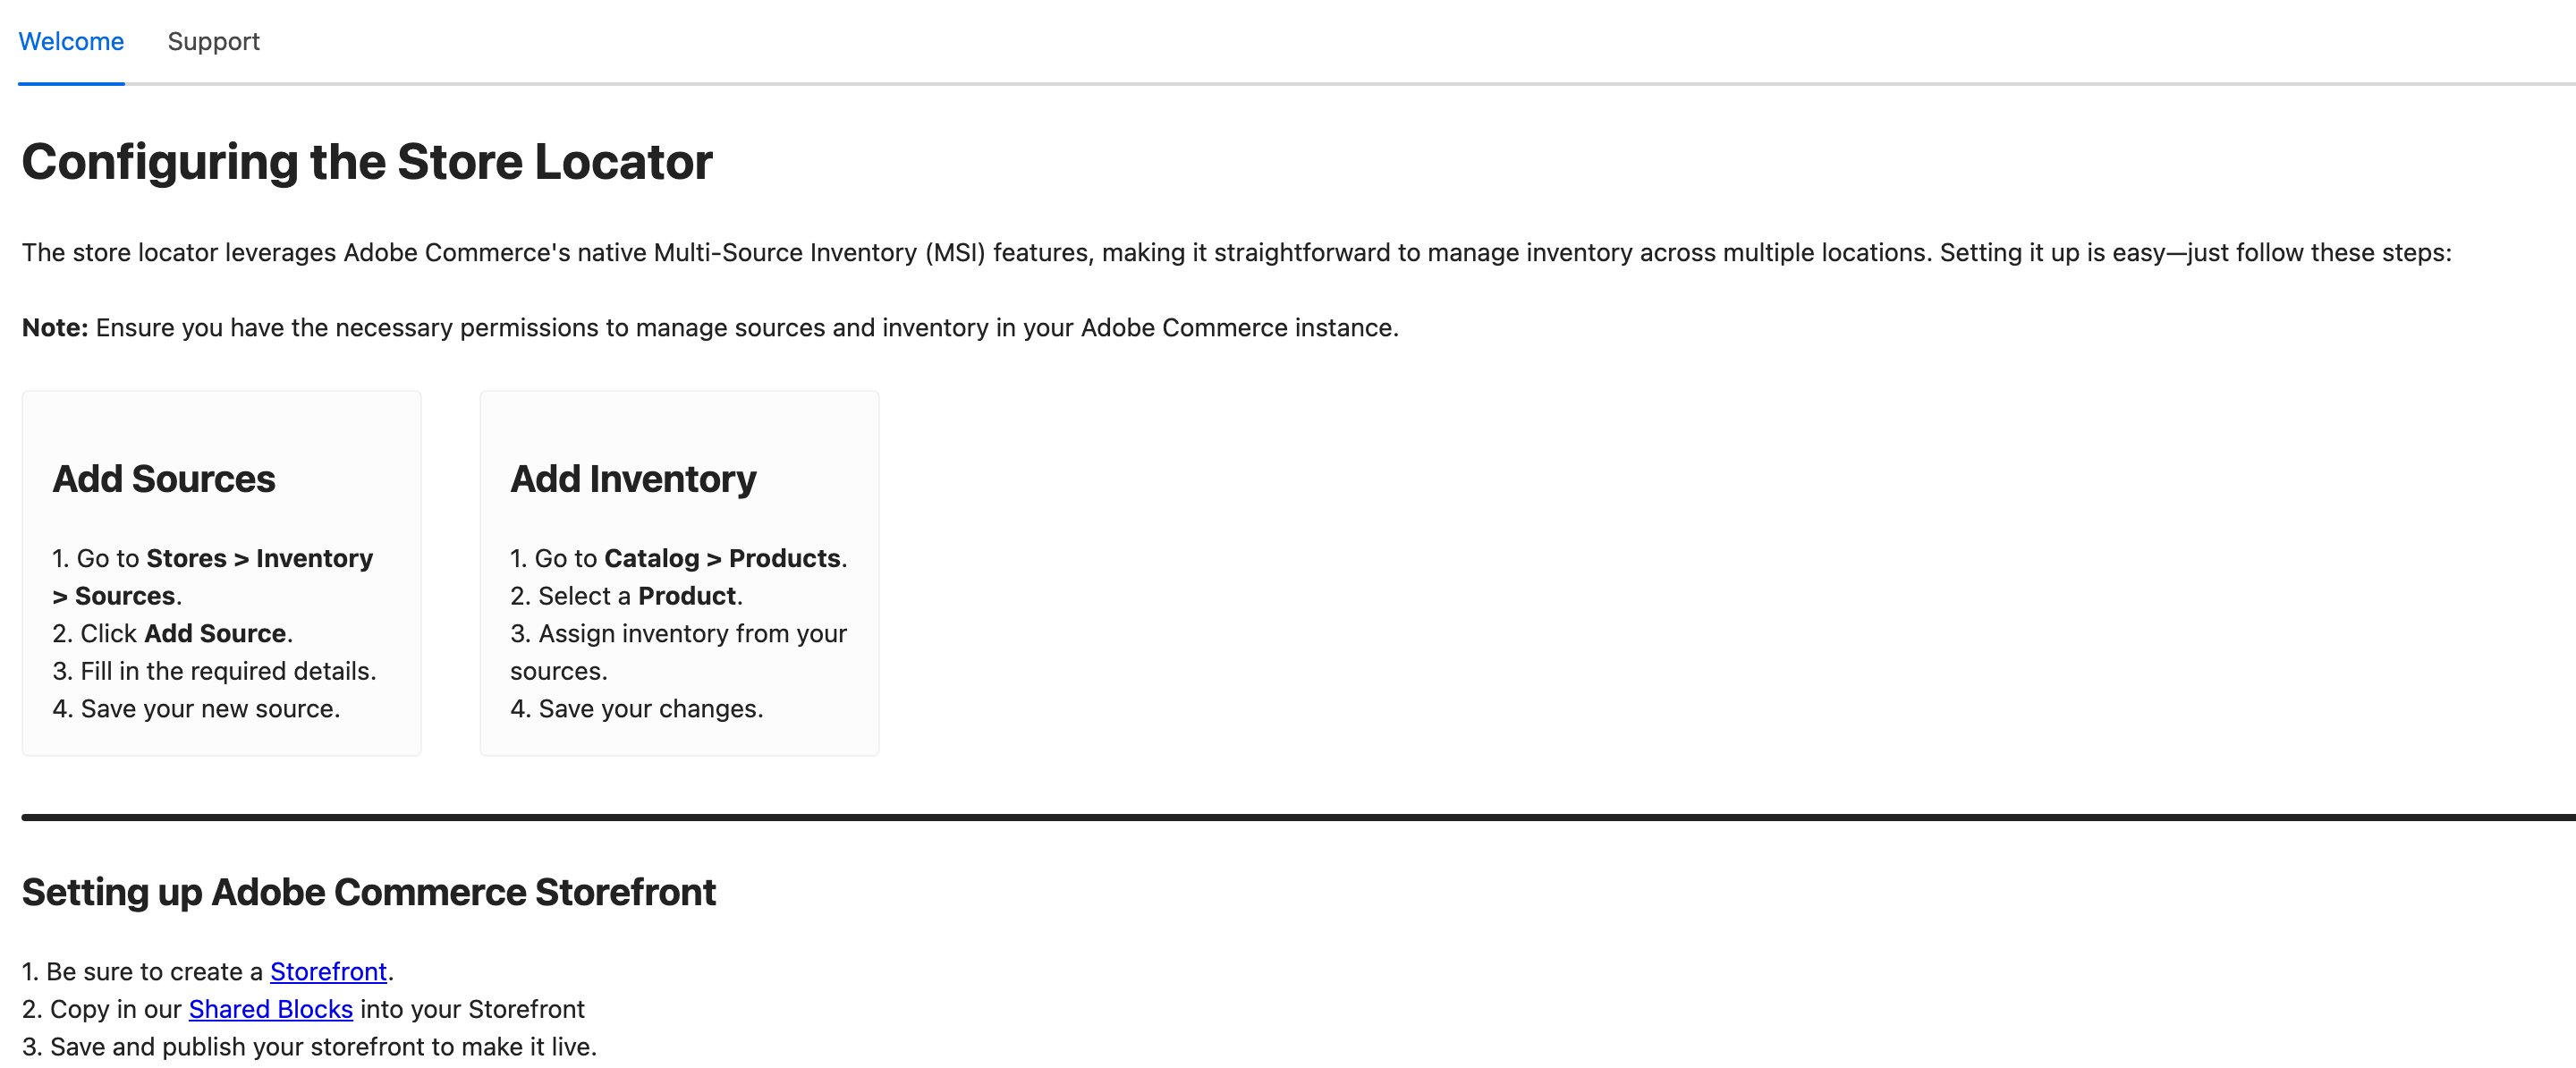
Opening the app from the Commerce Admin shows the Welcome tab, which summarises the Sources and Inventory setup covered below:
The Support tab collects the links you will need if something goes wrong — issue tracker, contact address, and this documentation:

These two screenshots are generated from the built UI by
npm run docs:capture, so they track the app rather than drifting from it.
Configure API Mesh (Optional)
This app includes a mesh.json configuration file that sets up an API Mesh to proxy Adobe Commerce GraphQL requests. The mesh routes requests through a single AdobeCommerceAPI source pointed at your Commerce instance’s /graphql endpoint.
-
Ensure the API Mesh plugin is installed:
aio plugins:install @adobe/aio-cli-plugin-api-mesh -
Create the mesh (from the project root):
The
COMMERCE_ENDPOINTenvironment variable must be set to your Commerce instance URL in the.envfile.aio api-mesh create mesh.jsonThis registers the mesh with your App Builder workspace.
-
Verify the mesh is running:
aio api-mesh getYou should see the mesh configuration with the
AdobeCommerceAPIsource. -
Always Update the mesh after configuration changes:
aio api-mesh update mesh.json
For more details, see the API Mesh documentation.
App Management Configuration
Store Locator uses Adobe Commerce App Management to securely store Commerce API credentials. Credentials are stored in App Builder and retrieved server-side by Runtime actions — never exposed in public storefront code.
restApiBaseUrl Format
The restApiBaseUrl field varies depending on your deployment type:
- SaaS (Adobe Commerce as a Cloud Service): The base URL usually includes the tenant ID and should not include
/rest.- Example:
https://na1-sandbox.api.commerce.adobe.com/[tenant-id]/
- Example:
- PaaS / On-Prem: The base URL should end with
/rest/V1.- Example:
https://[environment-name].us-4.magentosite.cloud/rest/V1
- Example:
Configuration Fields
The following fields are configurable via App Management (Apps > App Management > Store Locator > Configure):
| Field | Type | Description |
|---|---|---|
restApiBaseUrl |
URL | Your Commerce REST API base URL (see format above) |
authType |
List | Authentication type: oauth (PaaS/On-Prem) or ims (SaaS) |
consumerKey |
Password | Commerce integration consumer key (OAuth only) |
consumerSecret |
Password | Commerce integration consumer secret (OAuth only) |
accessToken |
Password | Commerce integration access token (OAuth only) |
accessTokenSecret |
Password | Commerce integration access token secret (OAuth only) |
imsClientId |
Password | Adobe IMS client ID (SaaS only) |
imsClientSecret |
Password | Adobe IMS client secret (SaaS only) |
Setup by Deployment Type
For PaaS/On-Premise (OAuth 1.0a):
- Set
restApiBaseUrlto your Commerce URL ending with/rest/V1 - Set
authTypeto “PaaS/On-Premise (OAuth 1.0a)” - Enter your Integration credentials from Commerce Admin (System > Extensions > Integrations)
For SaaS (IMS):
- Set
restApiBaseUrlto your Commerce API URL with tenant ID (no/restsuffix) - Set
authTypeto “SaaS (IMS)” - Enter your IMS client credentials from Adobe Developer Console
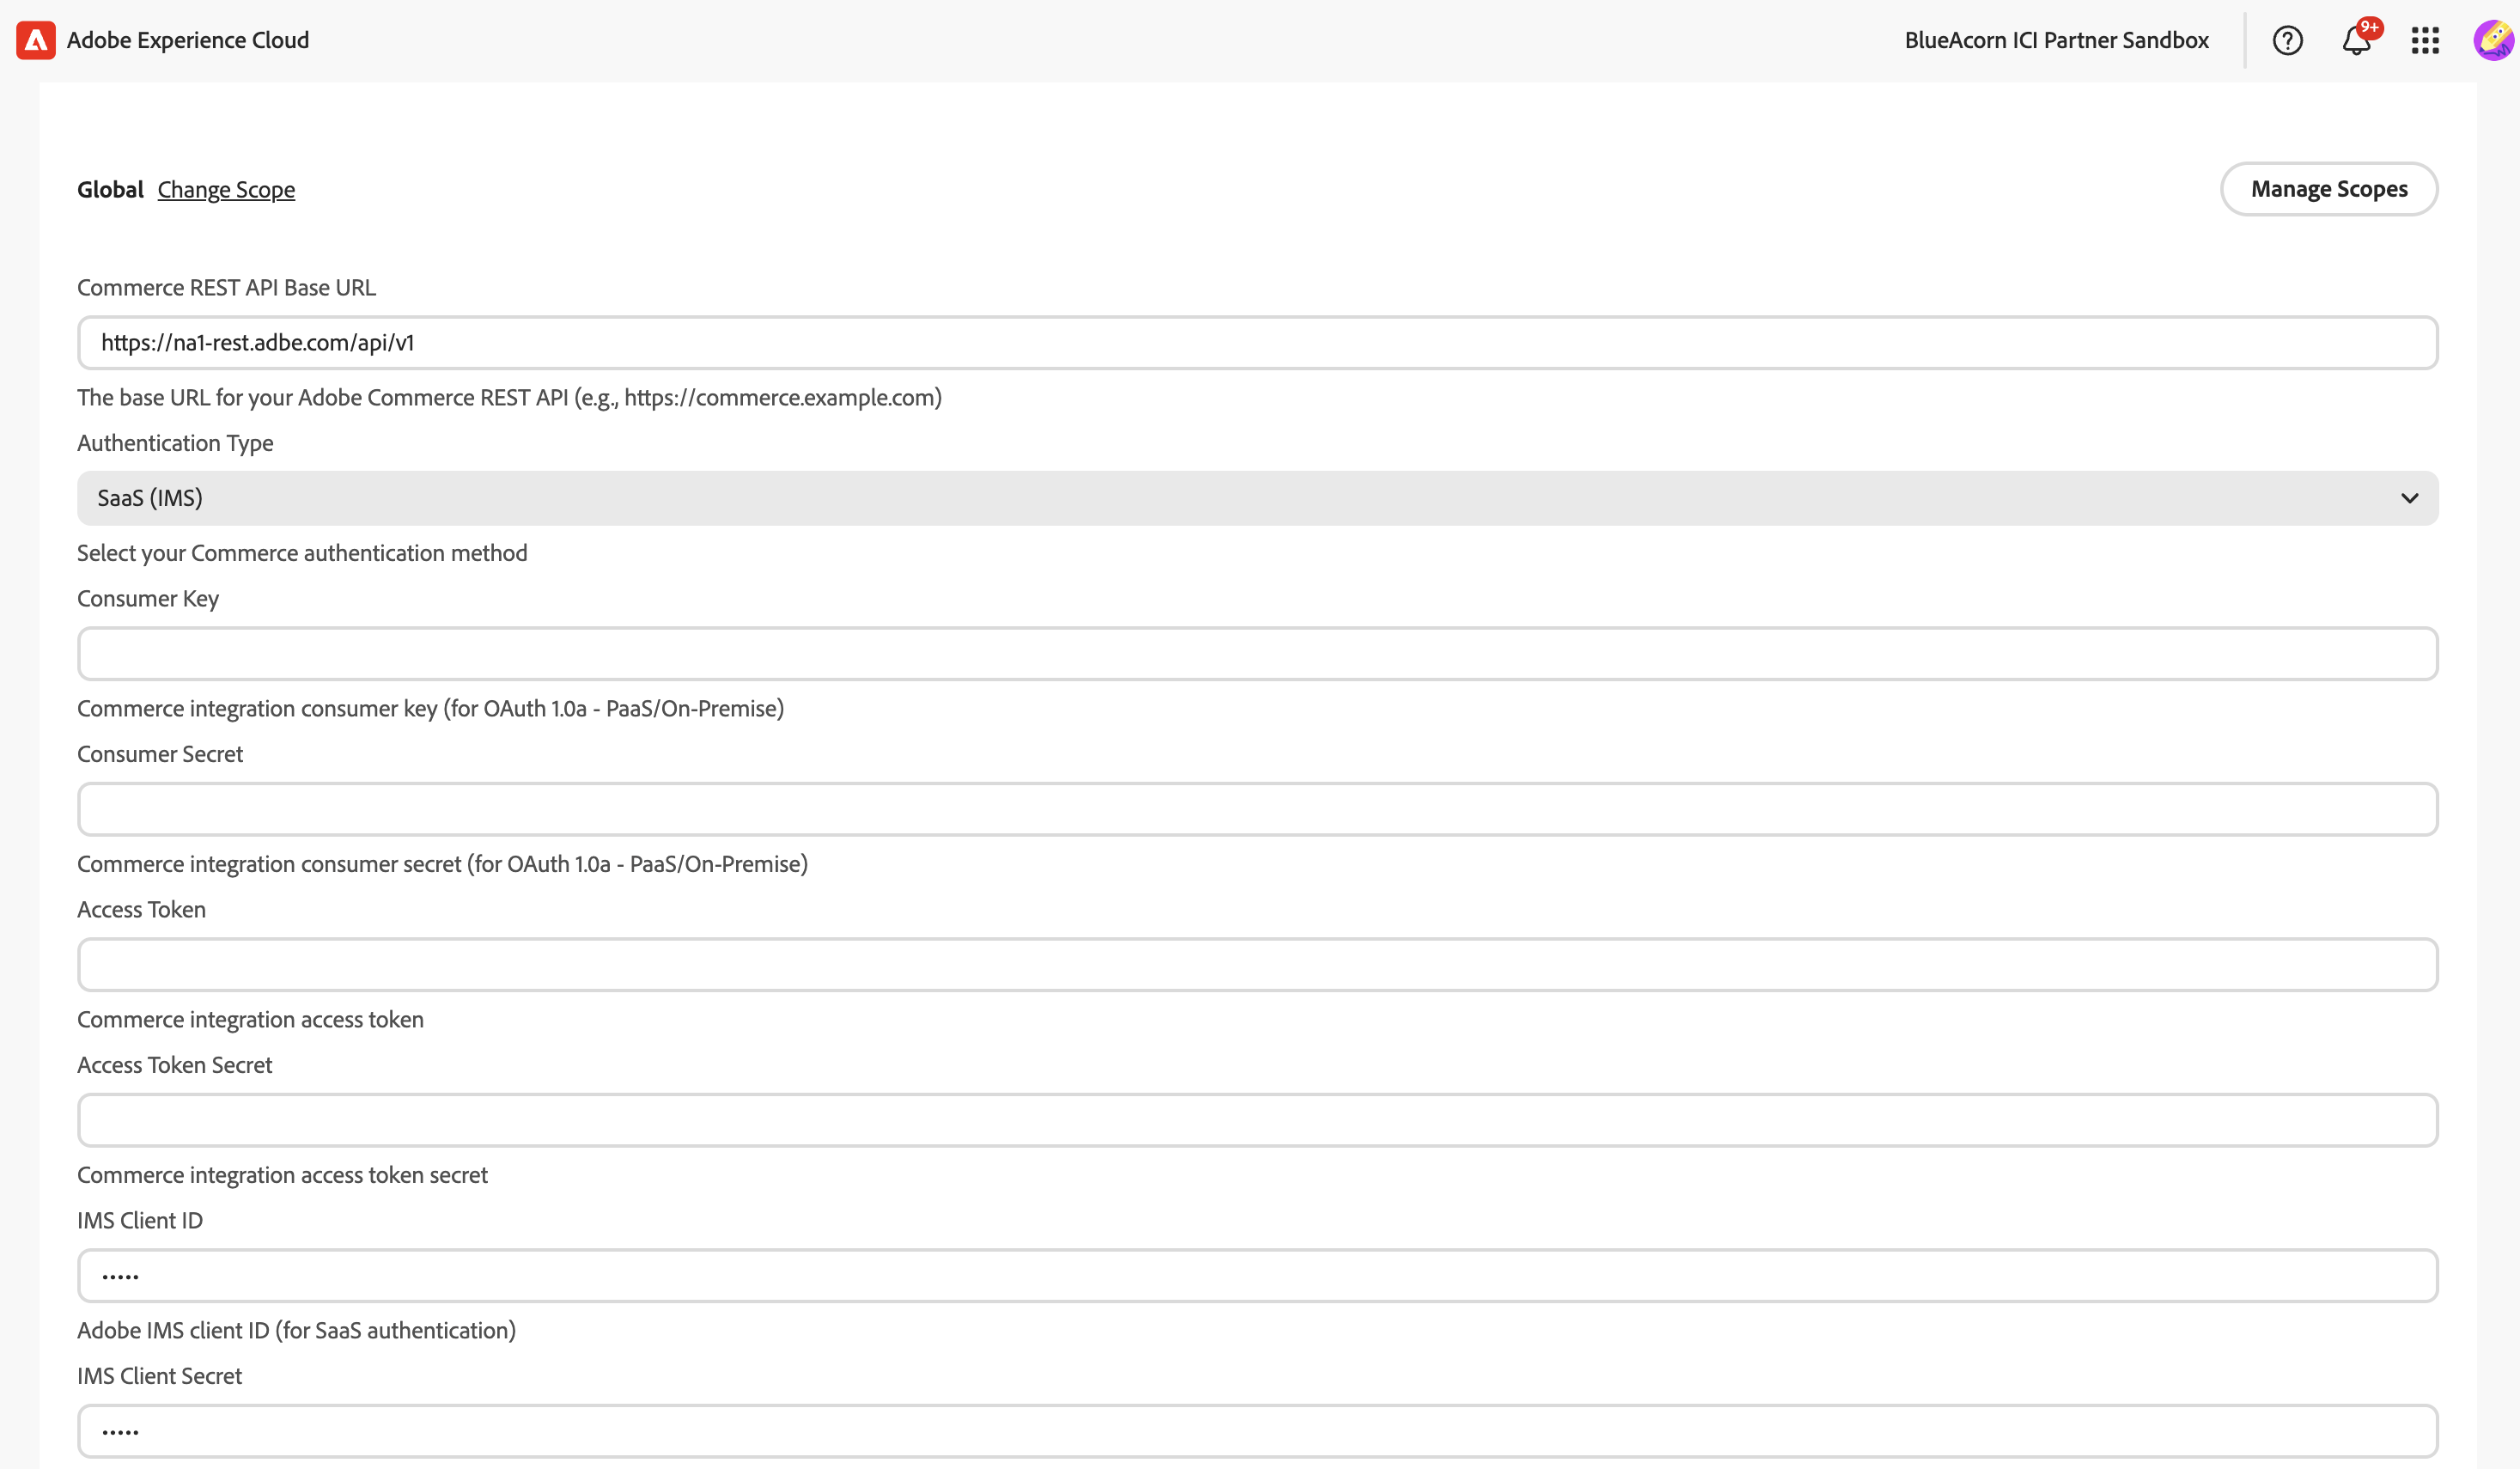
After configuring, go to Stores > Configuration > Adobe Services > Admin UI SDK and click Refresh Registrations.
Security Benefits
- No exposed tokens: Credentials never appear in public storefront code
- Server-side authentication: All API calls go through the inventory-proxy action
- Automatic token management: IMS tokens are automatically refreshed; OAuth tokens can be regenerated
- Merchant-controlled: Merchants configure credentials through Admin UI, not by editing code
Configure Sources and Inventory
Store Locator leverages native Adobe Commerce Sources and Inventory to provide store locations and product availability.
You can find Sources in the Stores menu under Inventory.
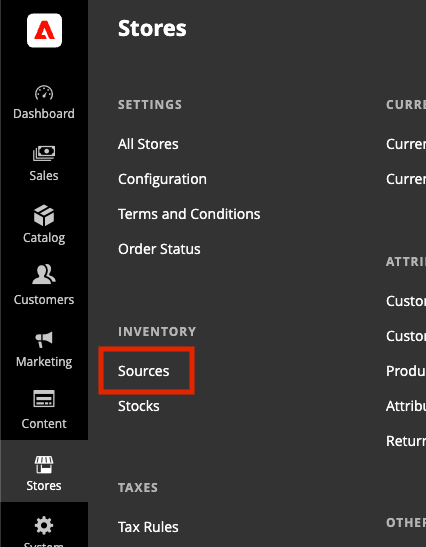
Add New Sources
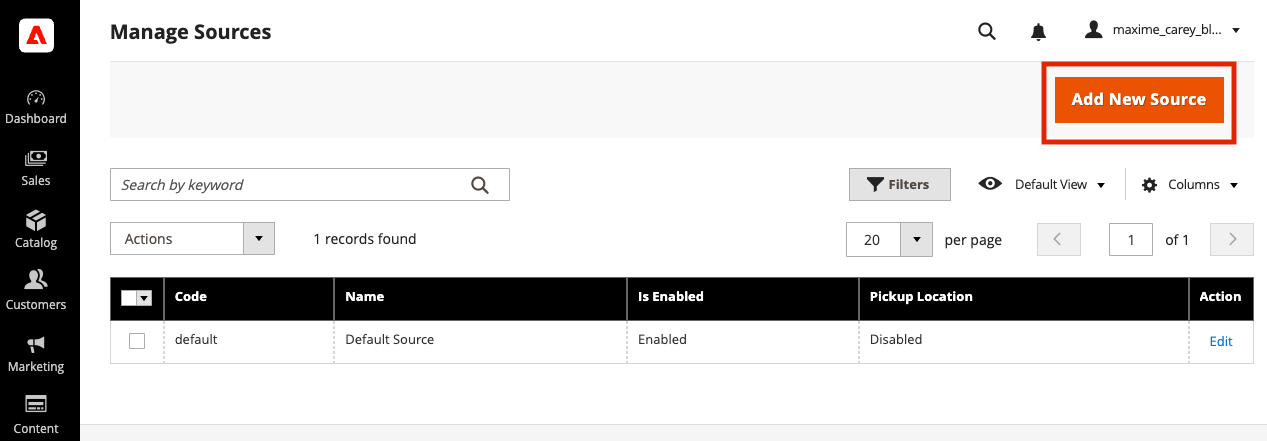
Configure Inventory
Once sources are added, you can add inventory to the sources through Catalog > Products.
EDS Storefront Blocks
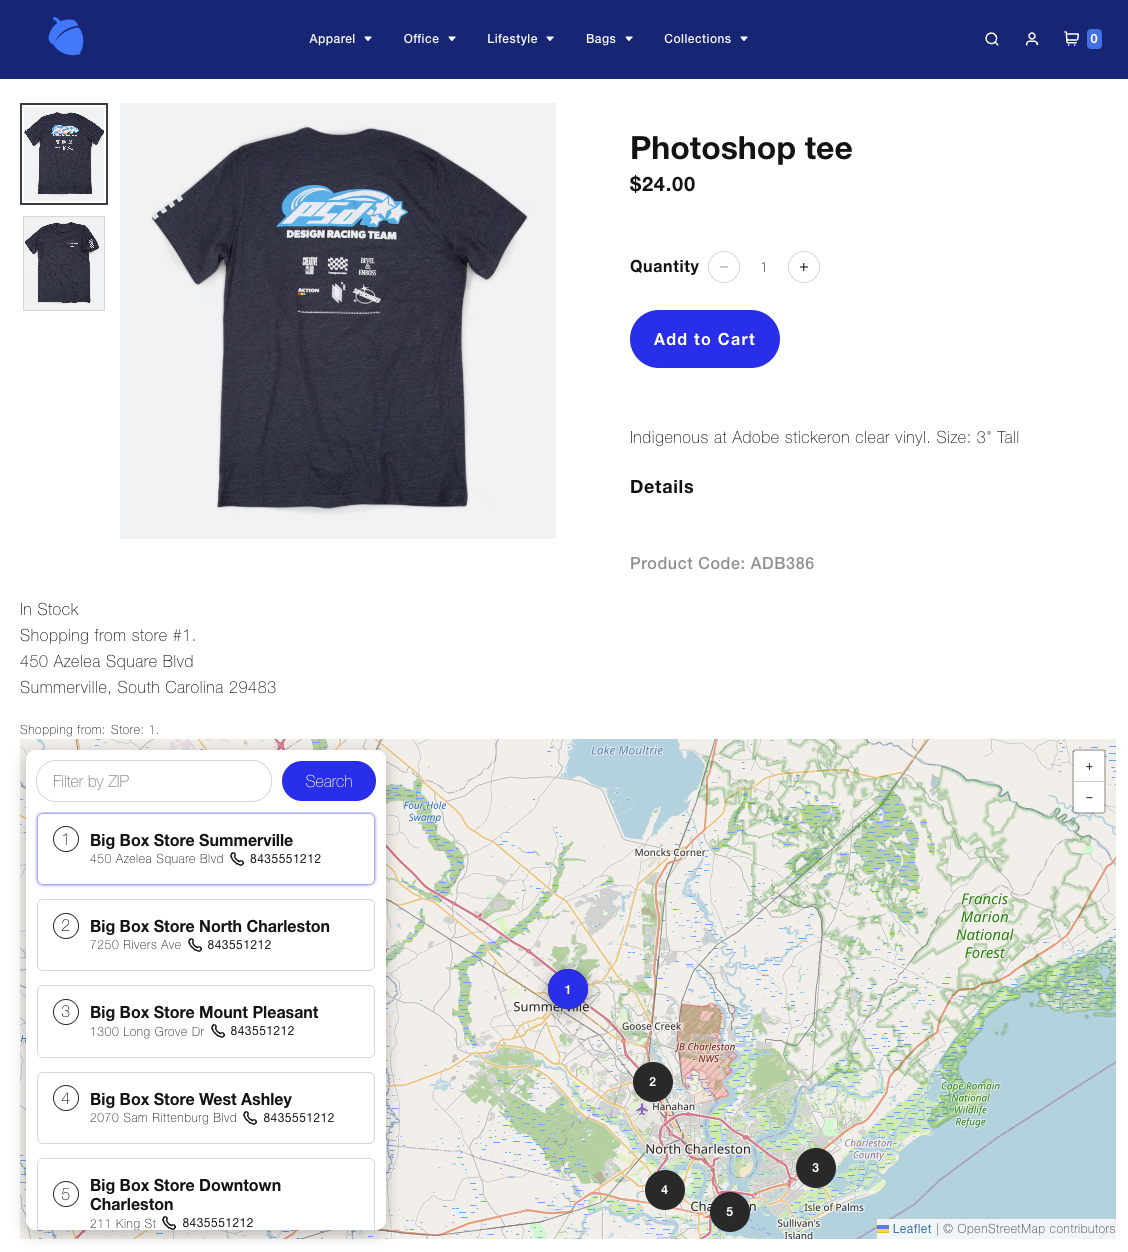
The Store Locator includes shared blocks for Adobe Commerce Storefront (Edge Delivery Services):
- Store Locator Block — Interactive store finder with map, ZIP code filtering, and store selection.
- Product Availability Block — Displays product inventory availability across store locations.
Block Installation
See the Blocks README for npm installation and configuration instructions.
Alternatively, you can manually copy the store-locator/ and product-availability/ directories from blocks/ to your storefront’s blocks/ directory.
Stores Sheet
The store locator block reads store data from a store-locator/stores sheet in your authoring environment (Google Drive, SharePoint, or da.live). This sheet produces a stores.json endpoint consumed by the block at runtime.
An example CSV is included at blocks/example-stores.csv. Your sheet should contain these columns:
| Column | Description |
|---|---|
name |
Store name |
rating |
Star rating (1–5) |
numOfReviews |
Review count label (e.g. “26 reviews”) |
type |
Store type label (e.g. “Big Box Store”) |
address |
Street address |
phone |
Phone number |
lat |
Latitude |
lng |
Longitude |
commerce_warehouse_id |
Commerce source code (maps to inventory sources) |
zip |
ZIP code (used for filtering) |
state |
State |
city |
City |
hours |
Store hours |
Example stores.json output (one entry):
{
  "name": "Big Box Store Summerville",
  "rating": "4",
  "numOfReviews": "(26 reviews)",
  "type": "Big Box Store",
  "address": "450 Azelea Square Blvd",
  "phone": "8435551212",
  "lat": "33.0385",
  "lng": "-80.153",
  "commerce_warehouse_id": "bbs1",
  "zip": "29483",
  "state": "South Carolina",
  "city": "Summerville"
}
With the AEM Sidekick installed, you can manage the stores sheet from your authoring environment. Use AEM Sidekick to Preview and Publish changes — this produces the stores.json file that drives the storefront experience.
For more details on store card configuration and block customization, see the Store Locator Block README.
Document-based Authoring
To add the blocks to a page, create single-cell tables in your EDS document (Google Doc, SharePoint, or da.live) with the block name as the header.
Store Locator block:
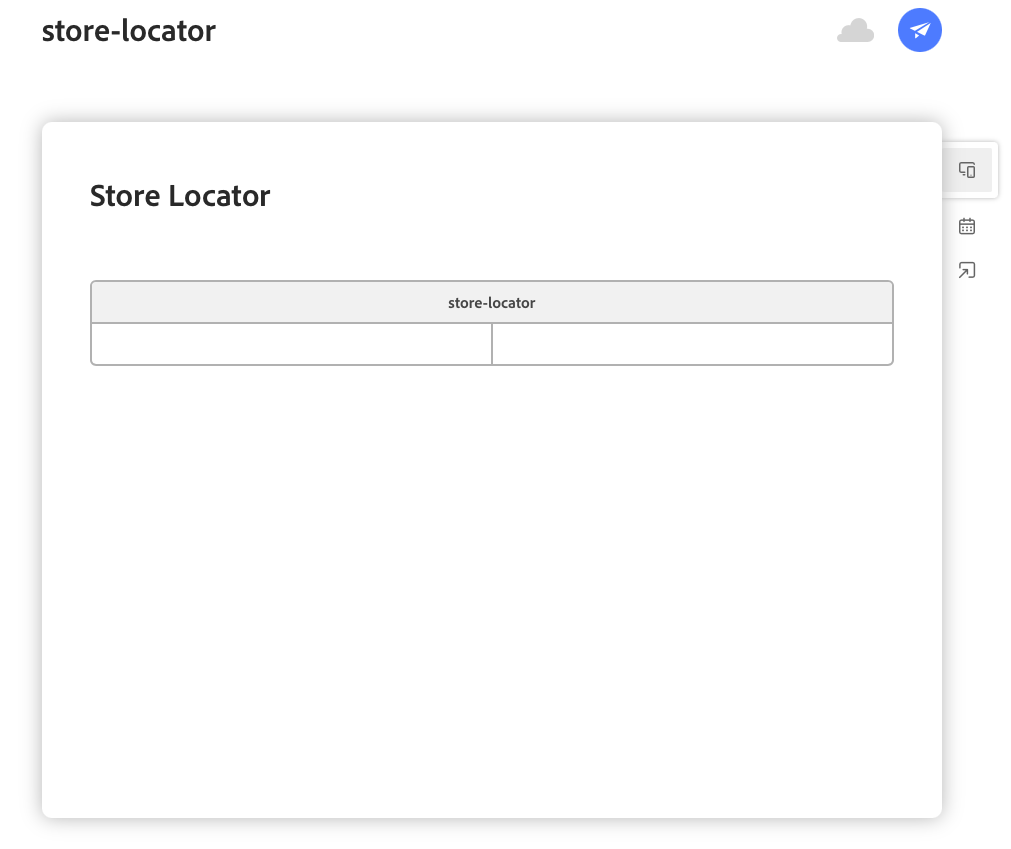
| store-locator |
|---|
Product Availability block:
| product-availability |
|---|
The Product Availability block displays stock status (In Stock, Low Stock, or Out of Stock) for the currently selected store. It queries the Catalog Service GraphQL API using the storefront’s existing commerce-endpoint from configs.json — no additional configuration is required. It works with both Adobe Commerce SaaS and PaaS deployments.
For detailed implementation notes, see the Product Availability Block README.
Here is an example of both blocks on a Product Details Page: